Having first reviewed the pre-lesson questionnaire (click here to view- also available in the Lesson section of the course) completed by your student, you need to learn through a casual conversation what the student thinks his/her putting problems are. These may not be the true problems, but this is a good place to start learning where the real problems lie.
The student needs then to select a putter – his own or one from your demo inventory – to putt to a hole or simulated cup about 10 feet away, on an indoor putting carpet or on a very flat portion of a green.
If you have video camera and a tripod, this is the time to use it. The preferred position of the camera should be directly in front of the student (facing the student’s chest) – about 10 feet away -- pointing at a right angle to the target line. From this position, you can see the ball position between the feet and watch the stroke.
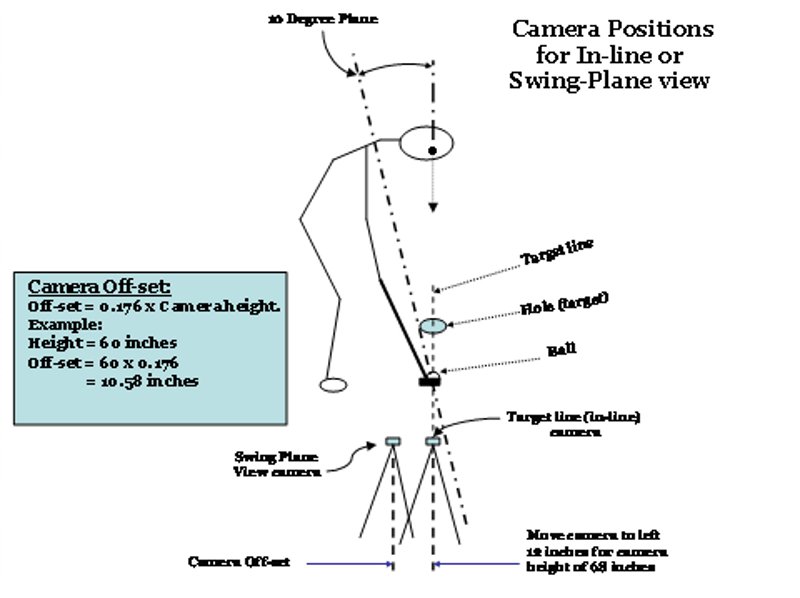
If you have a second camera and tripod, they should be set up to the right of the student (for a right - handed player) and on the target line about 10 feet away. From this second, target - line camera you will be able to see the alignment of the feet, the ball position relative to the eyes, general posture and putter head path, etc.
After recording the student’s putting stroke going straight down the target line, keep the camera at the same distance from the student and move the camera to the left of the target line (for a right handed golfer) from its on-line position so that the camera is now in the same plane as the swing path. The swing plane is inclined at 10 degrees to the vertical (this will vary a little based on the students physique and posture but a 10 degree plane is about average and will work well for most students with a small tolerance +/- one degree or so). To get the camera in this plane, there are two critical measurements; 1) the height of the camera lens and 2) the distance to the left of the target line. If the lens is 68 inches (5’ 8”) above the ground it must be 12 inches to the left of the target line. An alternative to these measurements that may fit your camera better and still provide the 10-degree plan is setting the camera at 4 feet high and 8 ½ inches to the left of the target line (see sketch).
It should be understood that the in plane swing path can be judged fairly well with the rear camera on the target line. But the putter will be on the inside of the vertical plane at the top of the backstroke and also inside the vertical plane on the follow through. If this path is not excessively inside the vertical then this would be a first order practical position for the rear camera. If you need to be more precise especially with the better golfer then positioning the camera into the swing plane is necessary.

Observing a student down the target line of the putt will not adequately show the correct swing path of the putter. In this position the club head path may appear to be moving off the intended swing path. However, viewing the putting stroke in same plane of the ball and the target line will help in determining the student’s actual swing path. If you do not have a camera to record a student’s putting stroke, you can stand in the same places as the recommended camera set-up. Holding a golf club shaft vertically in the air can help the instructor align the student to the target as well as to find the correct swing plane.
Using both of these cameras before any instruction is given will enable you to demonstrate both the before-lesson stroke and, at the end of the lesson, the after-lesson stroke. The cameras should be located in the same position for the before and the after if a change in the stroke is to be observed.
This is a critical stage in diagnosing the student ’s problems and fitting a putter, because it gives you a sound basis for any changes you need to make, one that the student can see and understand for him/herself.